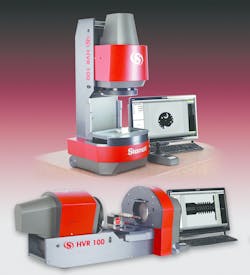
New Bench-Top Vision System Functions in Vertical or Horizontal Orientation
ATHOL, MA U.S.A. (October 27, 2017) – Today The L.S. Starrett Company (www.starrett.com) has announced the introduction of the HVR100-FLIP, an innovative new large field-of-vision (FOV) Benchtop Vision Measurement System that is capable of being used in either a vertical or horizontal orientation, features a high-resolution digital video camera and minimal optical distortion for accurate FOV measurements of up to 90mm (3.65"). The “FLIP”, developed by Starrett Kinemetric Engineering Inc., a subsidiary of The L.S. Starrett Company, made its North American debut at The Quality Show in Chicago, October 24th, 2017. A video on the new FLIP system and product brochure can be viewed at http://starrett.co/2gCZAyw.
“We are excited to introduce the FLIP system,” said Mr. Emerson Leme, Head of Metrology Equipment Division at Starrett. “With vertical or horizontal versatility, a large FOV, auto part recognition and powerful, easy-to-use measuring tools, we have taken vision technology to a new level, offering users unlimited flexibility, increased inspection throughput and reliable, accurate results.”
The FLIP horizontal or vertical orientation feature lends itself to an extremely wide array of applications from flat parts such as gaskets and seals, to turned and threaded parts. The system can be easily changed over from vertical to horizontal and back within minutes, and can be placed on most sturdy workbenches.
The compact Starrett HVR100-FLIP has a 24" LCD touch-screen monitor, a 348mm x 165mm (13.7" x 6.5") stationary top plate and 165mm (6.5") optics travel with a motorized power drive for accommodating various part sizes and enhanced performance. An LED ring light provides surface illumination and LED backlight offers transmitted illumination.
The main operator interface of the FLIP displays a live video image with software measurement tools and graphical digital reading of measurements. A part image can be resized using pan, zoom and measurements by simply tapping a feature on the monitor screen. A wireless keyboard and pointing device are also provided for entering file names and targeting key functions. MetLogix M3 software includes 2D geometric functions such as points, lines, circles, arcs, rectangles, distances, slots, angles and skew, and utilizing the part design DXF/ CAD file digital overlay makes part inspection simple.
Additional features and options that offer enhanced measurement capability and increased throughput include:
· “Auto Part Recognition” where the user simply places the part anywhere in the FOV without any fixturing and the system recognizes and inspects the part in a few seconds.
· “Digital Comparator-DXF overlay”
· “Profile Fitting”
· “Thread Measurement”
“The HVR100-FLIP video based measurement system is rugged and innovative, as equally effective on the manufacturing floor as it is in the Quality lab. The design structure allows for work handling and part fixturing and an operator interface typical of an Optical Comparator and Vision Metrology system, to measure parts in a progressive, efficient and practical way,” said Mark Arenal, General Manager at Starrett Kinemetric Engineering.
For more information visit www.starrett.com
