Eddy Current Technology
Eddy current technology is an electromagnetic technique widely used in the aerospace, automotive, petrochemical, and power generation industries for the inspection of metallic structures. In this technique, the probe, which is excited with an alternative current, induces eddy current into the part under inspection. Any discontinuities or material property variations that change the eddy current flow in the part are detected by the probe and considered a potential defect. Recently, an important improvement of this technique was realized with the development of eddy current array technology.
Eddy current arrays
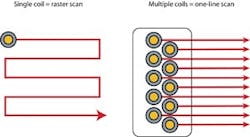
Eddy current array (ECA) technology electronically drives and reads several eddy current sensors positioned side-by-side in the same probe assembly. Data acquisition is made possible through the use of multiplexing, which avoids mutual inductance between the individual sensors.
Benefits of eddy current arrays
Compared to single-channel eddy current technology, eddy current array technology provides the following benefits:
- Drastically reduces inspection time
- Covers a large area in a single pass
- Reduces the complexity of mechanical and robotic scanning systems
- Provides real-time cartography of the inspected region, facilitating data interpretation
- Is well suited for complex part geometries
- Improves reliability and probability of detection (POD).
Eddy current array probes
An eddy current array probe can be optimized for a specific application by changing the coil configuration and the probe shape. Different types of probes can be realized like absolute bridge, differential bridge, absolute reflection, differential reflection, transmit-receive, shielded, and cross-axis.
Probes can be designed to detect a specific type of flaw or to follow the shape of the part being inspected. Standard designs are available to detect surface defects (such as cracks and pitting) and subsurface defects (such as cracks in multilayer structures and corrosion).
Imaging
Representation of the data plays a major role in the use of eddy current array. The Omniscan ECA allows the use of C-scan imaging, which is a color-coded two-dimensional mapping of the inspected surface. The data from each individual coil are recorded so the impedance plane is always available. The following image demonstrates the principle of the image representation. The ECA probe moves over a flaw and each coil produces an EC signal as shown. The C-scan representation is the color coded image of the amplitude of the signal. The X axis represents the movement axis while the Y axis represents the probe axis. So, the C-scan gives the position of the flaw as well as its size.
Testing and inspection
Eddy current array testing is used in a number of different fields like aircraft and engine maintenance and manufacturing, power generation, oil and gas, and tube manufacturing. This article covers the inspection of the engine disk dovetail.
Aircraft engines are submitted to a lot of stress. Rupture of rotating parts can cause catastrophic failure of the engine and the aircraft. The engine disk dovetails or the blade attachment, being submitted to high stress, are inspected to make sure there is no crack initiation site within the area of the dovetail. Conventional eddy current are mainly used for this application. The operator is required to use a tooling that holds a conventional EC probe. The operator scans the probe along the dovetail length and index position of the probe approximately 40 times to assure full coverage. The operator also has to constantly monitor the screen of the conventional eddy current instrument. This method is long, tedious, and causes fatigue to the operator.
An eddy current array method was developed specifically for this application resulting in a significant time-savings. A new eddy current array was developed composed of 32 sensors shaped in a way to fit the dovetail contour. This probe is attached to a holder designed for the application. The operator simply puts the probe in place and pushes it only one time through the dovetail. This one-pass inspection assures full-coverage of the dovetail areas. The C-scan mapping displayed on the instrument also helps the operator to localize position of a defect and to size it. The inspection time is reduced dramatically while the reliability of the inspection is increased resulting in an important gain for the inspectors.
Conclusion
Eddy current array is a new technology that is used successfully in many different fields. Portable and easy to operate, the Omniscan ECA makes the use of EC arrays easy. The main advantages of the ECA technology are increasing inspection speed, better reliability due to C-scan imaging, and better reproducibility and probability of detection due to the coverage of the whole surface assured by the array.
Andre Lamarre is Business Development Director, Aerospace and Defense for Olympus NDT.
Additional ReSources
Olympus NDT
www.olympus-ims.com
